


Introduction.
Once you publish your first repository on Github and get hooked, the next natural step is to build an entire career and a second life on this platform. If you are thinking of doing the same, here’s some helpful advice.
The world of technology is growing fast, and more people than ever before are interested in learning to code. That said, Github as an online community for coders also represents a potential new home for developers.
In my previous article A Beginner's Guide To Git and Github: A 4-Part Series, I introduced you to Git and Github.
With that in mind,This article will give you a head start on the information you need to know about developing a career on Github, from beginner tips to advanced techniques that will help you thrive as a coder in this community.
Lets Gooooooo!
Step 1: Opening a GitHub account & Installing Git.
Starting a GitHub account is the first step to becoming a developer. You can use GitHub to store your code, share projects with others, and even join an open source community to help you learn more about coding.
You must visit GitHub's website and complete the signup form there in order to create your account.

Secondly, we'll need to install git, follow these instructions to install it. Keep in mind that we will only be using git on the command line for this lesson.
Step 2: Creating a local git repository.
When using git to start a new project locally, you must first create a new repository. Check out this tutorial if you're not familiar with basic commands or the terminal.
Once it's installed:
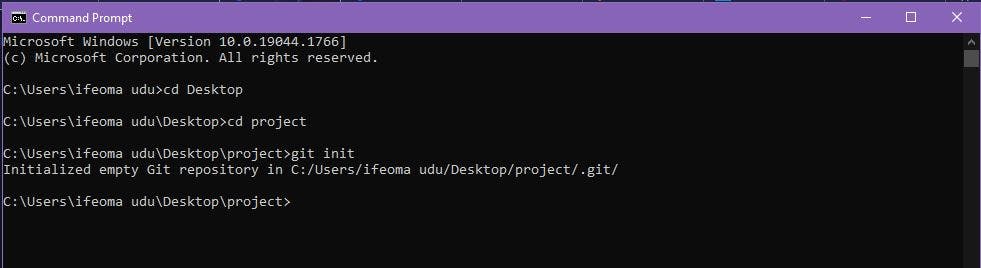
- Start by opening a terminal and using the 'cd' (change directory) command to navigate to the location on your local computer where you wish to put the project. If you have a desktop folder called "projects," for instance, you may do something like this:

- Run the 'git init' command to create a git repository in the folder's root:
Step 3: Add a new file to the repo.
Use whatever text editor you choose to add a new file to the project. A file will be recognized by git as being inside the repository after you add or modify it in a folder containing a git repo.
Git will not, however, track the file until you specifically instruct it to. Git will require a command to indicate that we do, in fact, want it to monitor our new file since it only saves and handles changes to files that it is tracking.
Use the 'git status' command to determine which files git knows exist after creating the new file.
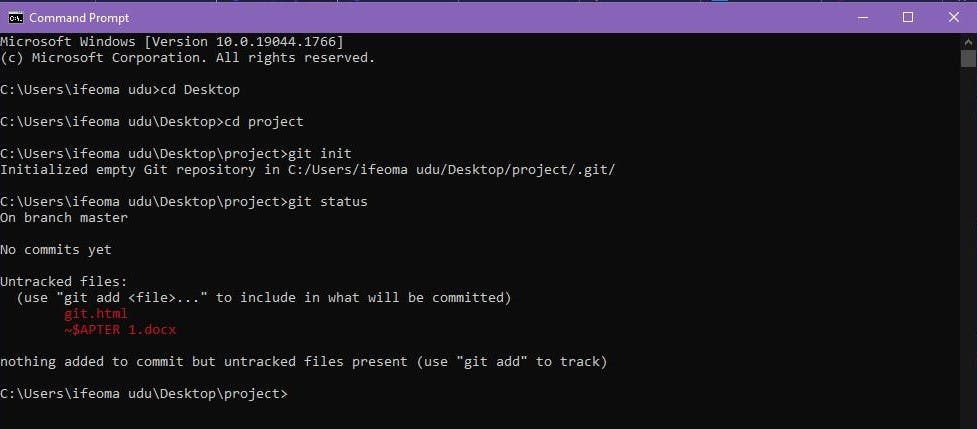 What this basically says is, "Hey, we noticed you created a new file called git.html, but unless you use the 'git add' command we aren't going to do anything with it."
Note: The Staging Environment & Commits.
In computer programming, a staging environment is simply a copy of the production environment, where final testing and debugging occurs before release.
A commit serves as a record of the changes you've made since your last commit. You basically instruct git to create a commit after making changes to your repository (like adding or changing a file).
So how do you instruct git to include particular files in a commit? The staging environment or come into play here. As seen in step 3, when you modify your repository, git detects that a file has changed but does nothing with it (like adding it in a commit).
You must first add a file to the staging environment before you can add it to a commit. You may accomplish this by using the 'git add . ' command (see Step 4 below).
Once all the files you desire have been added to the staging environment using the git add command, you may instruct git to assemble those items into a commit using the git commit command.
Step 4: Adding a file to the staging environment.
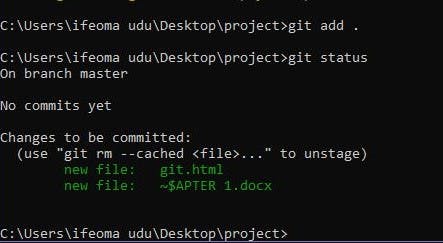
- Use the 'git add .' command to add a file to the staging environment.

- You may verify that git has added the file to the staging environment by running the 'git status' command again (notice the "Changes to be committed" line).
Note: that the file has not yet been included in a commit, we will look at this in the next post.
Conclusion.
This post taught you how to install Git, build a local repository, use some fundamental git commands (git add ., git init, git status), learn about staging environments, and learn about commits. Congratulations! You are getting close to becoming a Github Pro. We'll learn about branches, how to construct one, and how to set up a new github repository in the post that follows. Remember to like, share, and comment on the content.
Until then, Bye 👋🏾.